✓ Royal Mail Authorised Inspector since 2008 | Trading since 2005


Mailhub Printing Support
Mailcoms Mailhub · Printing
How to fix printing problems on the Mailcoms Mailhub: change the two HP45 ink cartridges, clear cartridge contact errors, clean and align the print heads, and set Payment Surcharge Entry postage.
Why is my Mailhub not printing properly?
Poor, faint or missing print on the Mailhub is almost always the ink cartridge. It uses two HP45 print heads that need cleaning regularly. The machine cleans them automatically or on request, and you can also clean them by hand. The two heads need aligning after a cartridge change.
How do I change the ink cartridge on the Mailhub?
- Open the cover – the cartridge moves to the replacement position. Keep fingers clear while it moves.
- Firmly press the bottom of the cartridge to disengage it – it clicks out of place.
- Carefully lift out the old cartridge.
- Remove the protective layer from the new cartridge.
- Seat the new cartridge in the machine.
- Press firmly on the top until it clicks into place.
- Close the cover and press OK.
How do I fix printing problems on the Mailhub?
The Mailhub uses two offset HP45 ink cartridges, which can clog with paper dust or dry out in storage or if the machine is unused. Cleaning and priming the heads usually restores a clean print.
- Remove the ink cartridge from the franking machine.
- Give the print heads a good clean with a warm damp cloth or tissue.
- Holding an alcohol wipe or tissue against the heads, point the brass print heads down and away from you and shake well. Ink may leak, so take care.
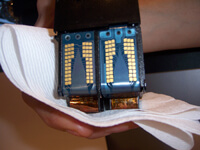
- Check the ink is flowing – you should see two sets of solid tram lines like the example below.
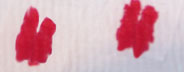
- If you see broken tram lines or no ink like the example below, wipe the heads with the alcohol wipe or damp tissue and repeat.
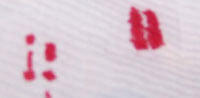
- If the problem persists, clean the brass print heads with a cloth and warm soapy water, then repeat.
How do I clear cartridge contact errors on the Mailhub?
Messages such as ‘Not Registering’ or ‘No Cartridge Found’ are usually dirty cartridge contacts. Clean the gold contacts to re-establish the connection.
- Turn the unit on and open the lid or top cover.
- Remove the ink cartridge from the franking machine.
- Using a clean dry lint-free cloth, the supplied alcohol wipe or a rubber, briskly rub the gold cartridge contacts from top to bottom. Also wipe the corresponding gold pins inside the machine to make sure no ink is on them.
- Re-insert the cartridge and close the top cover.
- Print a test page. If the problem persists, contact Mailcoms.
How do I check the ink level on the Mailhub?
Display the ink level and cartridge data, including ink consumed, colour, status and first-used date.
As a user: Menu → Cartridge → Ink Information.
As supervisor: Menu → Maintenance → Cartridge → Ink Information.
How do I clean the Mailhub print heads from the menu?
Run an automatic clean first; if printing is still unclear, clean the heads by hand.
Automatic clean: Menu → Ink Cartridge → Cleaning Process (user), or Menu → Maintenance → Cartridge → Cleaning Process (supervisor).
Manual clean:
- Open the base cover.
- Remove the ink cartridge.
- Clean the heads with a soft damp cloth.
- Refit the cartridge and close the cover.
How do I align the print heads on the Mailhub?
Align the heads after a cartridge change, or if there is a gap between the top and bottom of the imprint.
- Press Menu, select Maintenance and press OK.
- Select Cartridge and press OK.
- Select Headset Alignment and press OK.
- Press OK and put a piece of paper in the mail transport – the system prints a test pattern.
- Use the Up / Down keys to select the letter beside the straightest, most complete vertical line.
- Press OK to validate and repeat until the lines are aligned.
- Press Back to return to the menu.
How do I run the wiper process on the Mailhub?
The wiper process cleans the wiper that maintains the print heads.
- Press Menu, select Maintenance and press OK.
- Select Cartridge and press OK.
- Select Wiper Process and press OK.
- Open the top cover and remove the ink cartridge.
- Press OK twice to start the carriage motor.
- Check the wiper, clean it if needed, then press OK.
- Refit the cartridge, close the top cover and press OK.
How do I set postage for Payment Surcharge Entry mail on the Mailhub?
Payment Surcharge Entry lets you enter a postage amount manually for surcharged mail. Switch the imprint type, set the slogan, ERA, amount and date, then print.
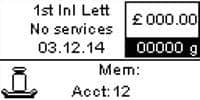
- From the Normal imprint home screen, press Menu to open the Imprint screen.
- Select the Type line, press OK, choose Payment Surcharge Entry and press OK.
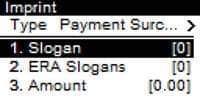
- To set the slogan, select Slogan and choose a slogan or None. To set the ERA, select ERA Slogans and choose an ERA or None.
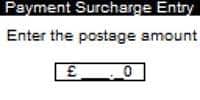
- Select Amount, enter the postage amount and press OK.
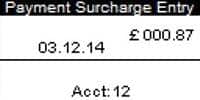
- If needed, select Date and choose a date option, or No Date Advance to print the current date.
- Press the Home button to return to the home screen – you are now ready to print.
Mailhub Printing – Frequently Asked Questions
Why is my Mailhub not printing or printing faintly?
The two HP45 print heads have usually clogged or dried out. Clean and prime them against tissue until two solid tram lines appear, then refit and test.
How do I clear a No Cartridge Found message on the Mailhub?
Remove the cartridge, briskly clean the gold contacts with a lint-free cloth, alcohol wipe or rubber, refit it and print a test page.
How do I change the ink cartridge on the Mailhub?
Open the cover, press the bottom of the cartridge to release it, fit the new cartridge until it clicks, close the cover and press OK, then align the heads.
How do I print a manual postage amount on the Mailhub?
Switch the imprint type to Payment Surcharge Entry, select Amount, enter the postage and press OK, then print.
Still having printing problems with your Mailhub?
Our technical team are Royal Mail Authorised Inspectors and fully qualified franking machine engineers. Call us on 01543 572 776 – Mon–Fri 9:00 to 17:00.