✓ Royal Mail Authorised Inspector since 2008 | Trading since 2005


SendPro Mailstation & Mailsend Lite Connection Support
SendPro Mailstation & Mailsend Lite · Connection
How to connect the SendPro Mailstation and Mailsend Lite to your network – back-panel ports, MAC address, wired and wireless setup, proxy, troubleshooting and advanced connectivity requirements.
What are the connections on the back of the Mailsend Lite?
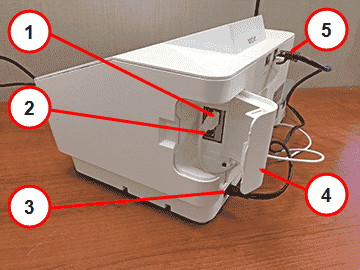
- USB port, type A – for the external scale.
- USB port, type B – inactive and does not support any devices.
- AC power cable connection – use only the provided power cable.
- USB port cover.
- RJ45 (Ethernet) port – for a LAN connection.
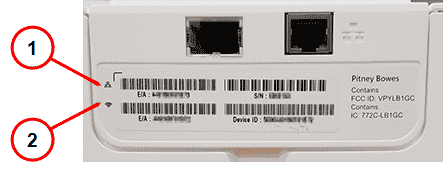
How do I check the MAC address on the Mailsend Lite?
The device has separate wired and wireless MAC addresses, printed on a sticker under the LAN port.
- Tap Settings.
- Tap the right arrow to advance to the next page.
- Tap About Device.
- Tap Network Info – the MAC address shown matches the current connection type (wired or wireless).
How do I set up a wired network connection on the Mailsend Lite?
Use a wired connection when you connect the device to your network with an Ethernet cable.
- Tap Settings.
- Tap the right arrow to advance to the next page.
- Tap Network Settings.
- Tap Change Network Settings.
- Tap Wired.
- Tap Advanced Network Options.
- Tap Continue.
How do I set up a wireless (Wi-Fi) connection on the Mailsend Lite?
Use a wireless connection to connect the device to your network over Wi-Fi.
- Tap Settings.
- Tap the right arrow to advance to the next page.
- Tap Network Settings.
- Tap Change Network Settings.
- Tap Wireless.
- Tap Select Wireless Network and choose your Wi-Fi network (or Join Other Network if hidden).
- Enter your Wi-Fi password and tap Next.
- Tap Connect, then Continue.
How do I set up a proxy server on the Mailsend Lite?
Proxy servers add performance and security.
- Tap Settings, advance to the next page and tap Network Settings, then Change Network Settings.
- Tap your Wireless or Wired (Ethernet) option. For Wireless, select the network, tick Advanced Options and choose Proxy: Manually configure proxy settings. For Wired, select DHCP or Static IP, then set Proxy to Manual.
- Enter the Proxy Hostname (the IP, HTTP or HTTPS address of your proxy server).
- Enter the Proxy Port.
- If your proxy needs authentication, tick Need Authentication and enter the Proxy Username and Password (case sensitive).
- Tap Next, then Connect, then Continue.
How do I fix wired or wireless connection problems on the Mailsend Lite?
Connection problems are usually the settings, the physical connection or signal, or a firewall. Work through these in order:
- Restart the device (hold power until Shutting Down, wait 5 seconds, tap power), then hard reboot if needed (unplug power for ten seconds).
- For wired: make sure the device is not connected to a phone line or PC Meter Connect (not supported), the network cable clicks in fully, and the LED lights by the network port are lit. Try another cable or wall port if the lights are off.
- For wireless: check the Wi-Fi signal has at least two bars; move the device closer to the router or remove sources of interference.
- Check the network settings under Settings, Network Settings, Change Network Settings (DHCP vs Static IP and any proxy) with your IT department.
- Ask your IT department to check the firewall is not blocking required ports or addresses.
- If one connection type will not work, try the other (wired or Wi-Fi).
What are the advanced connectivity requirements for the Mailsend Lite?
If you have strict network security, your IT administrator may need these specifications.
Wi-Fi: supports IEEE 802.11b/g/n 2.4GHz and 802.11a/n 5GHz networks. It does not support 802.1X enterprise/domain authentication or public/guest networks with a web-page login.
Ports: connection uses ports 31314, 993 or 443 (TCP); upgrades use port 80 (TCP/HTTP); data transfers via HTTPS with TLS 1.2. The device uses outbound communications only.
IP: DHCP (dynamic IP) is the default. Static IP is supported (IP address, subnet mask, default gateway, primary DNS).
URLs: allow the following through your firewall – ideally the wildcard *.sl.pb.com. If a wildcard is not possible, allow:
- upgrades.sl.pb.com
- imp.sl.pb.com
- agent.sl.pb.com
- slpb-us-east-1-imp-csd01a.boxen.sl.pb.com
- slpb-us-east-1-imp-csd02a.boxen.sl.pb.com
- slpb-us-east-1-imp-csd03a.boxen.sl.pb.com
- slpb-us-east-1-imp-csd04a.boxen.sl.pb.com
Note: Reverse lookups of the device IP addresses resolve to Amazon AWS servers.
Mailsend Lite Connection – Frequently Asked Questions
How do I connect the Mailsend Lite to Wi-Fi?
Tap Settings, Network Settings, Change Network Settings, Wireless, Select Wireless Network, choose your network, enter the password and tap Connect.
Does the Mailsend Lite work on a phone line?
No. It connects by wired Ethernet or Wi-Fi only – it does not support a phone line or PC Meter Connect.
How do I find the MAC address on the Mailsend Lite?
Tap Settings, About Device, then Network Info – the MAC address shown matches the current wired or wireless connection.
What ports does the Mailsend Lite need open?
Connection uses ports 31314, 993 or 443, upgrades use port 80, and the device transfers data via HTTPS with TLS 1.2 using outbound connections only.
Still having connection problems with your Mailsend Lite?
Our technical team are Royal Mail Authorised Inspectors and fully qualified franking machine engineers. Call us on 01543 572 776 – Mon–Fri 9:00 to 17:00.