✓ Royal Mail Authorised Inspector since 2008 | Trading since 2005


SendPro C Auto/Auto+ Printing Support
Pitney Bowes SendPro C Auto / Auto+ · Printing
How to manage printing on the Pitney Bowes SendPro C Auto and SendPro C Auto+ franking machine, including print modes, checking ink, replacing the ink cartridge and print head, print maintenance, fixing poor print quality, feeding mail, clearing jams and cleaning the sensors.
What are the print modes on the SendPro C Auto / Auto+?
As well as printing postage, the device has other print and feed modes. Tap Print Mode on the Envelope Printing screen to choose:
- Date and Time Stamp — prints just the date and time, with no postage.
- Graphic Only — prints a graphic, with no charge.
- Postage Printing — the default mode for printing mail.
- Seal Only — seals envelopes without printing.
How do I check the ink level on the SendPro C Auto / Auto+?
- Tap the Settings icon in the global toolbar.
- Scroll down and tap Envelope Printer Maintenance.
- View the remaining ink level, then tap Done.
How do I change the ink cartridge on the SendPro C Auto / Auto+?
To change the ink cartridge, open Install Ink in Envelope Printer Maintenance, swap the cartridge and run a test print.
- Tap the Settings icon, scroll down and tap Envelope Printer Maintenance.
- Tap Install Ink.
- Lift the cover — the ink cartridge moves to the front.
- Remove the old cartridge as shown on the label next to the holder.
- Insert the new cartridge and close the cover. The cartridge repositions itself.
- Run a print test to confirm a good test pattern.
Important: Only use Mailcoms Royal Mail approved ink cartridges. Non-Mailcoms or third-party cartridges can damage your franking machine.
How do I change the print head on the SendPro C Auto / Auto+?
To change the print head, open Install Printhead in Envelope Printer Maintenance, remove the ink cartridge, release the two grey tabs to lift out the old print head, then fit the new one.
- Tap the Settings (gear) icon, scroll down and tap Envelope Printer Maintenance.
- Tap Install Printhead.
- Lift the cover, flip open the ink cartridge guard and remove the ink cartridge.
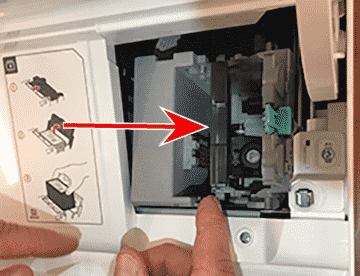
- Squeeze the two grey tabs on either side of the print head, lift and tilt it gently to the right, then pull it up and out of the holder.
- Note the alignment tabs and orientation, then insert the new print head by squeezing the tabs and sliding the alignment pins into the lower slots until it snaps into place.
- Reinstall the ink cartridge, close the guard and the cover, then tap Done.
- Print a test pattern to confirm the print head is working.
How do I run a print maintenance cycle on the SendPro C Auto / Auto+?
To run a maintenance cycle, clean the print head from Envelope Printer Maintenance and check the test pattern.
- Tap the Settings (cog) icon, scroll down and tap Envelope Printer Maintenance.
- Select Clean printhead. The machine cleans the print system (it will make some noise).
- When prompted, feed paper or a label through to print a test pattern.
- Compare it to the on-screen examples. If poor, tap Clean printhead again; if good, tap Done.
How do I fix poor print quality on the SendPro C Auto / Auto+?
Streaky, fuzzy, spotty, partial or missing print is usually a print head or ink cartridge problem. Print a test pattern, then clean the print head if needed.
- Tap Settings, scroll to Envelope Printer Settings and tap Envelope Printer Maintenance.
- Tap Print Test Pattern and feed an envelope or tape sheet through.
- If it matches the good example, tap Done. If it matches the bad example, tap Clean Print Nozzle and print another test pattern.
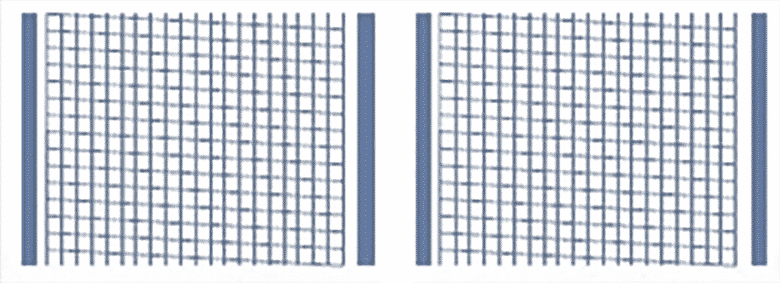
Important: If there is no improvement, do not keep repeating the cleaning, as cleaning the nozzles consumes ink. You may need to replace the ink cartridge or print head.
How do I print onto envelopes on the SendPro C Auto / Auto+?
To print onto envelopes, load the pile on the feeder, select your class and press Start.
- Place your pile of letters on the left of the feeder.
- Use the moveable guide to fit the size of the items so they do not misfeed.
- Select the class of mail in Envelope Printing.
- Press Start. The machine prints multiple items until the pile is empty or you stop it.
How do I print onto labels on the SendPro C Auto / Auto+?
To print onto labels (tapes), select your mail type, choose the quantity of tapes and press the tape button.
- From the Envelope Printing screen, select the type of mail you want to send.
- Press the number in the white area of the tape button to select the quantity, type the amount and press Apply.
- Press the blue tape button to produce your labels. The machine stops automatically when complete.
How do I print a test pattern on the SendPro C Auto / Auto+?
A test pattern shows whether the print head is working and whether you have enough ink.
- Tap Settings, scroll down and tap Envelope Printer Maintenance.
- Tap Print Test Pattern and feed an envelope through.
- If the lines are unbroken and match the Good pattern, tap Done. If lines are missing, tap Clean Print Head and print another pattern. If still poor, replace the ink cartridge.
How do I feed envelopes properly on the SendPro C Auto / Auto+?
Feeding envelopes correctly avoids skew and jams.
- Hold the far edge of the envelope against the back wall of the feeder.
- Slide it in until you feel it touch the rollers and hear the motor start — do not release it until the feeder grabs it.
- Feed envelopes one at a time, each pressed against the back wall, and make sure they fully exit the feeder (extend the stacker tray if needed).
Note: If you do not hold the envelope against the back wall it can feed in skewed, which can leave no postage or cause a “Clear Paper Jam”. Do not pull an envelope back out once the feeder has grabbed it. To help prevent jams, blow non-flammable compressed air across the feed deck to remove dust and debris.
How do I clear a “Clear Paper Jam” message on the SendPro C Auto / Auto+?
A “Clear Paper Jam” means an item is stuck in the print system. Release the transport and remove it; if it persists, clear the feed deck and reboot.
- Twist the jam lever on the front of the machine clockwise to open it.
- Remove any paper from the front of the transport and close the lever.
- If the message remains, open the main cover on the left, lift the white lever, remove any items from the feed deck, close the white lever and the top cover.
- If it still shows, reboot: turn the transport lever anticlockwise, hold the power button 5 seconds to turn off, wait one minute, then turn the power back on.
How do I clean the sensors on the SendPro C Auto / Auto+?
Clean the sensors if you get a jam message with no visible item stuck.
- Twist the jam lever on the front clockwise to open the rollers.
- Open the cover on the left to reveal the feeder rollers and pull up the white lever to raise the roller wheels.
- Use compressed air to remove paper dust along the feed deck.
- Close the white lever and the cover, pull up the lower feed deck and twist the jam lever anticlockwise to lock it.
- Test the machine to see if the error has cleared.
SendPro C Auto / Auto+ Printing – Frequently Asked Questions
How do I change the ink on the SendPro C Auto / Auto+?
Tap Settings > Envelope Printer Maintenance > Install Ink, lift the cover, swap the cartridge, close the cover and run a test print. Only use Mailcoms approved cartridges.
Why is my SendPro C printing poorly?
Print a test pattern from Envelope Printer Maintenance and tap Clean Print Nozzle if it is poor. If cleaning does not help, replace the ink cartridge or print head.
How do I clear a paper jam on the SendPro C Auto / Auto+?
Twist the front jam lever clockwise and remove the item, then check the feed deck under the left cover. If it persists, reboot the machine.
Still having printing problems with your SendPro C Auto / Auto+?
Our technical team are Royal Mail Authorised Inspectors and fully qualified franking machine engineers. Call us on 01543 572 776 – Mon–Fri 9:00 to 17:00.