✓ Royal Mail Authorised Inspector since 2008 | Trading since 2005


Label Printer Support
Pitney Bowes SendKit · Label Printer
How to install, use, maintain and troubleshoot the Pitney Bowes SendKit thermal label printer on Windows, Mac, Android and iOS, including driver downloads, label and roller changes, cleaning and error light fixes.
⚡ Save on supplies
Franking label rolls & supplies
Thermal label rolls and franking supplies for your label printer - genuine Mailcoms quality at Mailcoms prices. Free UK delivery on orders over £40.
Where do I download the SendKit label printer driver?
Download the correct printer driver for your operating system using the links below.
How do I install the label printer on Windows via USB?
To install the label printer on Windows via USB, connect and power the printer, download the W1110 driver from your online account, then run a test print.
Tip: You can also download the complete Windows network & scale install guide (PDF).
- Unpack the box. You should have a printer, 2 USB cables, a power cord, a scale and a network cable (the network cable is not used for USB installation).
- Sign into your online account using the link in your welcome email from Mailcoms.
- Connect the power cord and adapter to the printer and switch it on.
- Wait approximately 45 seconds until the green light is constant and the printer is ready.
- Press the X button and check the label feeds out correctly, then tear off the dispensed label.
- Connect the printer to your computer with the USB cable.
- Download the driver: in your online account click the Help icon, select Download Printer Driver (W1110), choose your operating system, select Run or Open, accept the licence agreement and follow the prompts, selecting Datamax-O’Neil w1110, then Finish/Close.
- Test print: go to Control Panel > Devices & Printers, double-click the printer (Datamax-O’Neil w1110), select Printer > Printer Properties > General > Print Test Page, and check the label printed correctly.
How do I install the label printer on Windows via a network connection?
To install the label printer on Windows over the network, print a system report to get the printer’s IP address, install the W1110 driver, then create a TCP/IP port pointing at that IP.
Tip: You can also download the complete Windows network & scale install guide (PDF).
- Unpack the box (printer, 2 USB cables, power cord, scale, network cable).
- Sign into your online account using the link in your welcome email.
- Connect the network cable to the printer and your network socket, connect the power cord and switch the printer on.
- Wait approximately 45 seconds until the green light is constant.
- Press the X button and check the label feeds out correctly, then tear it off.
- Print a system report to obtain the printer’s IP address: simultaneously press the button on the front of the printer and the recessed button on the back (using a pencil or similar). Keep the printed report for later.
- Download and install the W1110 driver from the Help icon in your online account, selecting Datamax-O’Neil w1110.
- When prompted, select Network and Next, then select the Datamax-O’Neil 1110 printer model and Next.
- Select Create Port, then TCP/IP Port and New Port.
- Run the Printer Port Wizard: select Next, enter the Ethernet IP from the system report and select Next. If the device is not found automatically, select Generic Network Card and Next, then Finish and Close.
- Confirm the new port appears in the list and select Next.
- Select Next to accept the default printer name, then Finish to complete setup.
- Test print via Control Panel > Devices & Printers > printer > Printer Properties > General > Print Test Page.
How do I install the SL-397-D scale on Windows?
To install the SL-397-D scale on Windows, download the SendPro Scale Utility from your online account, then connect the scale by USB.
- Sign into your online account using the link in your welcome email.
- Click the Help icon and select Download SendPro® Scale Utility. When the screen shows “We can’t find your scale”, click Download SendPro Scale App, select Run or Open and follow the prompts to install, then close the window.
- Place the scale on a firm, flat surface near your computer, connect it by USB and press the Zero button.
- Press the Mode button to select Kg.
How do I install the label printer on Mac via USB?
To install the label printer on Mac via USB, connect and power the printer, install the W1110 driver, add the printer in System Preferences, then test print.
Tip: You can also download the complete Mac network & scale install guide (PDF).
- Unpack the box (printer, 2 USB cables, power cord, scale, network cable — the network cable is not used for USB).
- Sign into your online account using the link in your welcome email.
- Connect the power cord and switch the printer on, wait about 45 seconds for a constant green light, press the X button to check the label feeds, and tear it off.
- Connect the printer to your Mac with the USB cable.
- Download the driver from the Help icon in your online account, then in Finder open the Downloads folder, double-click the .dmg, then the .pkg. If “Software cannot be opened because Apple cannot check it” appears, select OK, right-click the file and select Open, then Open, Continue, Install, and enter your username and password.
- Add the printer: go to System Preferences > Printers & Scanners, click the +, let the Mac detect the printer, click Select Software and choose the Datamax-O’Neil driver, select the printer and click OK.
- Test print: select the Printer tab at the top of the screen and click Print Test Page.
How do I install the label printer on Mac via a network connection?
To install the label printer on Mac over the network, connect it to your network, install the W1110 driver, then add the printer in System Preferences.
- Unpack the box (printer, 2 USB cables, power cord, scale, network cable).
- Sign into your online account using the link in your welcome email.
- Connect the network cable to the printer and your network socket, connect the power cord and switch on, wait for a constant green light, press the X button to check the label feeds and tear it off.
- Download and install the W1110 driver as in the USB method above (handling the Apple security prompt if it appears).
- Add the printer via System Preferences > Printers & Scanners, click the +, let the Mac detect it, click Select Software, choose the Datamax-O’Neil driver, select the printer and click OK.
- Test print from the Printer tab > Print Test Page.
How do I install the SL-397-D scale on Mac?
To install the SL-397-D scale on Mac, download the SendPro Scale Utility from your online account, then connect the scale by USB.
- Sign into your online account using the link in your welcome email.
- Click the Help icon and select Download SendPro® Scale Utility. When the screen shows “We can’t find your scale”, click Download SendPro Scale App, select Run or Open and follow the prompts, then close the window.
- Place the scale on a firm, flat surface, connect it by USB and press Zero.
- Press Mode to select Kg.
How do I set up the label printer on Android?
To set up the label printer on Android, connect and load the printer, pair it by Bluetooth, then configure it in the SendPro Mobile app.
Tip: You can also download the complete Android install guide (PDF).
- Unpack the box (printer, label roll, 2 USB cables, power cord, scale).
- Sign into SendPro Mobile from your Android device.
- Connect the power cord and press the Power button.
- Load the label roll: pull the release levers on both sides to unlock and lift the cover, remove the protective sheet, place the roll in the guide (firmly seated, stabiliser in the notch), thread it straight through and align with the output slot, push the first label out, close the cover and press Feed to align.
- Connect the USB wire from the scale to the printer.
- Press and hold the Bluetooth button to pair the printer with your device.
- In the SendPro Mobile app, tap Menu > Printer Settings, select Bluetooth Printer and Roll – 4×6 label size, tap Print Sample and select the QL-1110NWB printer to print a test label.
How do I set up the label printer on iOS?
To set up the label printer on iOS, connect and load the printer, pair it by Bluetooth, then configure it in the SendPro Mobile app.
Tip: You can also download the complete iOS install guide (PDF).
- Unpack the box (printer, label roll, 2 USB cables, power cord, scale).
- Sign into SendPro Mobile from your iOS device.
- Connect the power cord and press the Power button.
- Load the label roll: unlock and lift the cover, remove the protective sheet, seat the roll in the guide with the stabiliser in the notch, thread it through and align with the output slot, push the first label out, close the cover and press Feed.
- Connect the USB wire from the scale to the printer.
- Press and hold the Bluetooth button to pair with your device.
- In the SendPro Mobile app, tap Menu > Printer Settings, select Bluetooth Printer and Roll – 4×6, tap Print Sample and select the QL-1110NWB printer to print a test label.
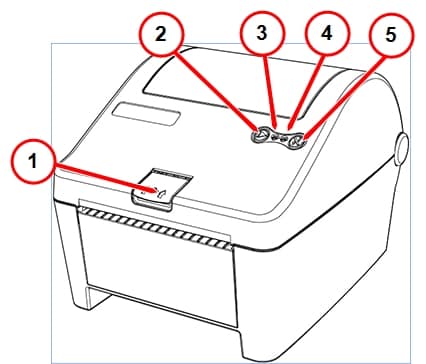
What do the label printer LED light codes mean?
The two LED lights on top of the label printer indicate its status. The table below explains the combinations.
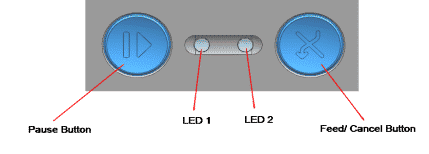
| LED 1 | LED 2 | Status |
|---|---|---|
| Green On | Green On | Ready Mode |
| Green On | Red Flashing | Print Cancel Mode – Wait |
| Green Flashing | Red On | Print temporarily paused – Wait |
| Green Flashing | Green Flashing | Print Standby Mode – Wait |
| Orange On | Orange On | Mode Switching Notification |
| Red On | Orange On | Error – Media Stoppage / Jam |
| Red On | Green Flashing | Error – Print Head Overheating |
| Red On | Orange Flashing | Error – No Media / Label Roll Empty |
| Red On | Red Flashing | Cover Open |
| Red On | Off | Error – Media Calibration Failure |
How do I switch the label printer from Standby to Print Ready mode?
To switch the label printer to print ready mode without feeding labels, press Pause, then feed one page to align the media.
- Press the Pause button.
- Press the Feed/Cancel button to feed one page, align the media position and switch to print ready mode.
How do I change the label roll on the label printer?
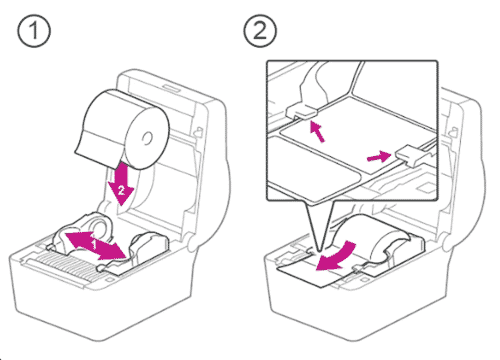
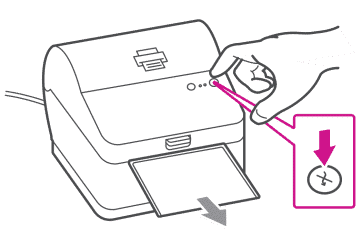
To change the label roll, position the new roll, close the cover and feed a label. Replace the roll when your thermal labels run out.
- Position the label roll as shown.
- Close the cover and press the button to feed the label.
How do I replace the roller on the label printer?
Replace the print roller if, after cleaning it, you still experience slipping, regular mis-feeds, or marks or smears on your prints.
Caution: Turn the printer off and disconnect it from the power supply before cleaning or replacing parts. The print head is very hot during printing — allow it to cool. Refer to the label safety instructions before lifting the top cover, and do not touch the heated area of the print head; personal injury may result from static electricity.
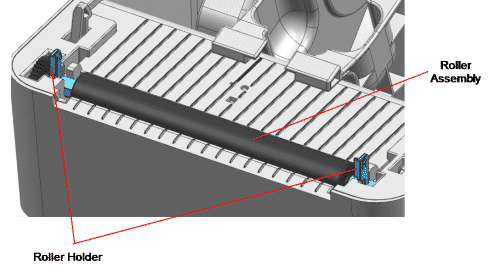
- Open the top cover.
- Rotate the roller holders and separate the roller assembly.
- Assemble the new roller assembly in reverse order.
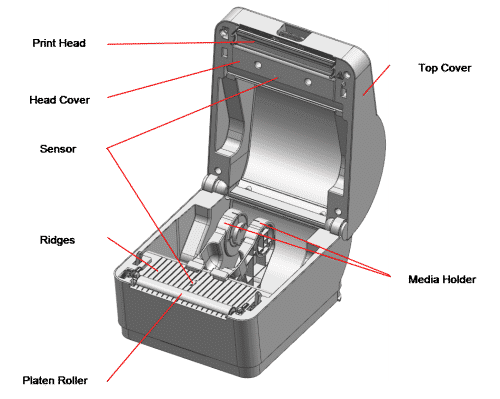
How do I clean the sensors, roller and media path on the label printer?
Cleaning the sensors, roller and media path is essential maintenance that helps keep print quality high.
Caution: Turn the printer off before cleaning and allow the print head to cool. Do not touch the heated area of the print head.
- Open the top cover and remove the label roll.
- Remove any dirt, dust or foreign objects with a cloth or cotton swab soaked in alcohol.
How do I clean the print head on the label printer?
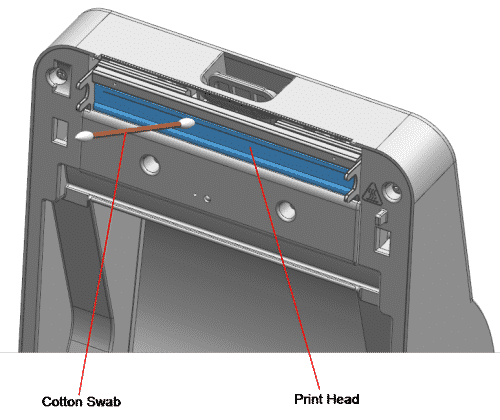
Cleaning the print head can improve print quality. Clean it each time you replace the label roll to prevent deterioration.
Caution: Turn the printer off before cleaning and allow the print head to cool. Do not touch the heated area of the print head.
- Open the top cover.
- Remove any dirt, dust or foreign objects with a cloth or cotton swab soaked in alcohol.
- Do not use the printer until the alcohol has evaporated completely (1–2 minutes).
How do I set the print options on the label printer (Mac)?
Setting print options is required after installing the Mac driver.
- Start an application and select Print from the File menu.
- Select Paper Size.
- Select Printer Features in the application name combo box.
- In the General feature set you can set Sensor Type, Rotation Angle and Number of Copies.
- In the Printer Setting feature set you can set Darkness, X Margin, Y Margin, Print Rate, Black mark offset, Tear-off offset, and whether to compress printing.
How do I print a test label on the label printer?
To print a test label, power the printer on while holding the Feed/Cancel button.
- Make sure the label roll is installed properly.
- Turn on the power while holding down the Feed/Cancel button until the test label begins to print (this may take around 10 seconds).
The test label shows the current printer configuration. After it prints, the printer enters print ready mode.
Why is my label printer not printing when the green light is flashing?
If the label printer is not printing but the green light is flashing (indicating it is receiving communication), the label roll is not seated properly. Re-seat the roll.
- Open the printer cover.
- Re-seat the label roll.
- Close the cover firmly.
- Try to print again.
How do I fix poor print quality on trackable labels?
Poor print quality on 4×6 labels (faded text, unreadable barcodes, or streaks) with a 1E35 or 1E42 printer is most likely caused by a build-up of debris on the print head. Clean the print head.
- Check for and remove any debris or label material on the rollers and print head.
- Turn off the power switch and unplug the printer.
- Open the printer and wait a few minutes for the print head to cool.
- Remove any installed media and, using a cotton bud moistened (not soaked) with isopropyl alcohol, thoroughly clean the print head.
How do I print shipping labels faster?
To print shipping labels faster, turn off the print options prompt so labels print with fewer clicks.
- Log into your shipping account, click the cog button (top right) and select Print Options.
- Un-tick Always show this option before printing.
How do I fix labels printing too small in my online shipping account?
Labels printing too small are caused by the wrong label format. Set the format to Roll – 4 x 6.
- Select Settings cog > Print Options.
- If the Choose Format menu is set to Plain Paper – A4, select Roll – 4 x 6.
- If Plain Paper is always selected by default, change this by adjusting your default label printing settings.
How do I cancel a Parcelforce or Royal Mail label that has already printed?
To cancel a label that has already printed, void it from your shipping history, then confirm the refund request.
- Select Home.
- Click Shipping History.
- Select the Label.
- Select Void label.
- Check the box on the pop-up notice.
- Select Continue.
- To confirm, select Home, click Shipping History, and check the status reads Refund Requested.
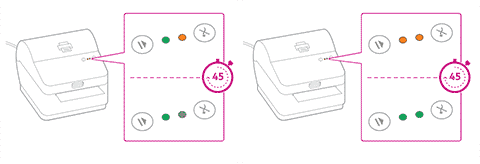
How do I fix two steady lights on the label printer?
Two steady lights during installation (instead of a single steady green light) simply mean you have a later version of software. The printer is ready.
- Tap Continue when ready — either one or two solid lights indicates the printer is ready.
How do I fix a Mac driver exception when installing or uninstalling?
An exception error when installing or uninstalling the Mac driver occurs on Macs running OS 10.14.5 or later, caused by updated security software. Approve the driver in Security & Privacy.
- When the message that the installer package “can’t be opened because Apple cannot check it for malicious software” appears, click OK.
- Open System Preferences and click Security & Privacy.
- Click the Open Anyway button.
- Click Open.
How do I fix a solid red light on the label printer?
A solid red light means the printer is not operating correctly or the paper size is not set correctly. First restart the printer; if that fails, reset it.
Solution 1 — Restart the printer
- Unplug the power cord. The screen should turn off after 10 seconds.
- Wait 2 minutes.
- Plug the power cord directly back into a working wall outlet.
- Quickly tap and release the power button to turn the device back on.
Solution 2 — Reset the printer
- Open the top cover and wind the media back onto the roll so it is clear of the feed rollers and sensors, then close the cover.
- Press and hold the reset button on the back of the printer, keeping it held during the next step.
- While still holding reset, press the Stop/Resume and Feed/Cancel buttons simultaneously until the left LED turns solid green.
- Open the top cover and feed the label so it is 6mm out of the printer.
- Press and hold Stop/Resume and Feed/Cancel simultaneously until the transport rollers begin to move the media, then immediately release both buttons. The media should advance one label and the left LED should be solid green.
If you need further assistance, contact Mailcoms on 01543 572 776.
SendKit Label Printer – Frequently Asked Questions
Why is my label printer not printing?
If the green light is flashing, the label roll is not seated properly — open the cover, re-seat the roll and close it firmly. A solid red light means you should restart or reset the printer.
Why are my labels printing too small?
The format is set to Plain Paper – A4. Go to Settings cog > Print Options and select Roll – 4 x 6, then set it as your default.
How do I keep my label printer printing clearly?
Clean the print head with isopropyl alcohol each time you change the label roll, and clean the sensors, roller and media path regularly to prevent faded prints and streaks.
Still having trouble with your SendKit label printer?
Our technical support team can help with your SendKit, label printer and online shipping account. Call Mailcoms on 01543 572 776 – Mon–Fri 9:00 to 17:00.