✓ Royal Mail Authorised Inspector since 2008 | Trading since 2005


DM110i/DM160i/DM220i Connection Support
Pitney Bowes DM110i / DM160i / DM220i · Connectivity
How to connect the DM110i, DM160i and DM220i via comms device, dongle, PC Meter Connect or LAN — including full troubleshooting for internet and LAN connectivity issues.
How do I reboot my comms device on the DM110i, DM160i or DM220i?
- Remove the power cable from the comms device.
- Once the lights have gone out, reinsert the power cable.
- Wait for the green light to appear.
- Try to reconnect your machine.
How do I reboot my dongle on the DM110i, DM160i or DM220i?
- Remove the power cable from the back of the machine.
- Remove the USB adapter (dongle) from the back of the machine.
- Check the LAN cable and USB on the dongle are secure.
- Plug the dongle back into one of the two USB sockets on the back of the machine (either port will work).
- Plug the power lead back into the machine.
- The machine will now initialise.
- Check the lights on the dongle — you should have a static light on the 100 and the ACT light should be flashing.
- Try connecting the machine again to see if the issue has been resolved.
What are the system requirements for PC Meter Connect?
To use PC Meter Connect, your PC must meet the following minimum requirements:
- Windows 2000, XP, Vista or 7 (32-bit or 64-bit). Mac, Linux and other non-Windows operating systems are not supported. FIPS mode is not supported on Windows 10.
- 1.2GHz processor, 512 MB RAM.
- USB port.
- Administrative rights to install software.
- Microsoft .NET Framework 2.0 (automatically installed if not present — one-time installation).
- Active internet connection.
How do I install PC Meter Connect on the DM110i, DM160i or DM220i?
PC Meter Connect lets your franking machine communicate with the Pitney Bowes Data Centre via USB and high-speed internet, more quickly and reliably than an analogue phone line. The current version is 05.00.0056.0000.
- Download the PC Meter Connect installer: pcmc-setup-v05_00_0081.exe.
- When prompted, select Run to launch the installer immediately. If you select Save, open the saved .exe file to launch the installer.
- Click Run when the installer launches.
- Select English (or your preferred language) when prompted.
- Follow the on-screen instructions to complete installation.
How do I troubleshoot PC Meter Connect connection problems?
Most PC Meter Connect issues fall into one of these categories: internet connection, PC Meter Connect configuration, or the franking machine itself.
First check: Go to dev.mailcoms.co.uk in a browser. If the site loads, your internet connection is working.
If the internet is working, check your PC Meter Connect configuration:
- Ensure you have the latest version of PC Meter Connect (05.00.0056.0000) installed and that it is connected to the mailing system.
- Right-click the PC Meter Connect icon in the system tray (bottom-right of the screen) and select Internet Settings.
- Set HTTP Transfer Encoding Method to Non-Chunked.
- Set Protocol to HTTP or HTTPS. If this option is greyed out, select Passive FTP Mode.
DE00 / DE01 / DE04 / DE014 / DE015 errors
These codes indicate a Data Centre connection error. Try the following in order:
- Try connecting in the morning when server load is lower.
- Reboot your franking machine and PC, then log on to your computer and retry.
- Right-click the PC Meter Connect icon, open Internet Settings, and change from Non-Chunked to Chunked. Click OK and retry.
- In Internet Settings, change FTP Mode from Passive to Active and retry.
- If the above fails, uninstall and reinstall PC Meter Connect using the link in the installation section above.
No Dial Tone (via PC Meter Connect)
This means the franking machine is not detecting the connected PC. Try the following:
- Reboot your franking machine.
- Check the USB cable is connected securely at both ends.
- Try a different USB port on the computer.
- Double-click the PC Meter Connect icon on the desktop to ensure the programme is open.
- If the issue persists, uninstall and reinstall PC Meter Connect.
Connection Lost
This error indicates a server-side issue at the postage provider. Keep retrying. If the problem persists for over 2 hours, contact Mailcoms for confirmation and next steps.
PC Meter Connect running in proxy only mode
Follow the same steps as the DE00 error section above to resolve this.
How do I set up a wired LAN connection on the DM110i, DM160i or DM220i?
- Turn the power off using the switch on the back of the machine.
- Connect one end of the Ethernet cable into the USB LAN adapter and the other end into your wall outlet or router.
- Plug the USB LAN adapter into the USB port on the machine.
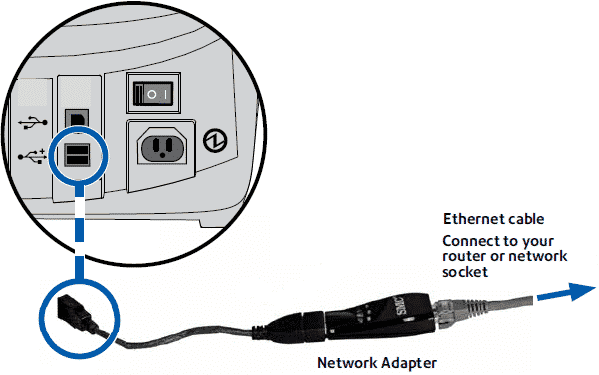
- Turn the power on using the switch on the back of the machine.
- Once the meter powers up, press the Options key.
- Press Page Down twice.
- Select Connect Data Centre.
- Select LAN Settings.
- Select Get IP: for a dynamic IP address select Automatically; for a static IP address select Manually (consult your IT department for the correct address).
- Press the Home key.
- Verify connectivity by pressing Add Postage, then selecting Check PBP Balance. If postage totals display, the installation is complete.
- When prompted to Add Postage, press No to return to the Home screen.
How do I troubleshoot a LAN connection issue on the DM110i, DM160i or DM220i?
LAN connection issues are usually caused by a physical connection fault, incorrect settings, or a firewall. Start by restarting the meter:
- Turn the power off with the power switch (or remove the power cable from the back of the meter).
- Wait for the display to turn off, then wait a further one to three minutes.
- Power the meter back up.
- Once initialised, attempt a connection (e.g. a balance enquiry).
If restarting does not resolve the issue, work through the troubleshooting steps below.
Check the physical connection
- Check that the green LED lights on the USB-to-Ethernet adapter are lit within one minute of turning on the meter.
- Either the 10 or 100 LED should be on (solid green), indicating the connection data transfer rate.
- If neither LED is on, ensure the LAN cable and adapter are firmly plugged in.
- Turn the meter off and move the LAN adapter to the other USB port. Repeat the check.
Note: Do not connect a phone line or PC Meter Connect computer while using LAN.
- If the LEDs are still unlit, confirm the other end of the LAN cable is plugged into a router or wall port. Try a different cable if needed.
- If no lights appear after a new cable is fitted, contact Technical Support.
LAN settings (DHCP)
- Press Options.
- Press Page Down twice.
- Select Connect-Data Centre.
- Select LAN Settings.
- Select Get IP, then Automatically.
- Reboot the meter after changing LAN settings.
Set a static IP address
- Press Options > Page Down twice > Connect-Data Centre > LAN Settings > Get IP > Manually.
- Enter the IP address, Subnet (Sub) and Gateway (Gwy) as provided by your IT department.
- Reboot the meter.
Set proxy settings
Note: Proxy support availability depends on the software version on your meter.
- Press Options > Page Down twice > Connect-Data Centre > LAN Settings > Page Down > Proxy.
- Select Enable Proxy to turn proxy support on.
- Select HTTP Settings or HTTPS Settings to enter the proxy address, port, username and password.
- Select Exclusions (Page Down) to add any proxy exclusions.
- Reboot the meter.
Set the DNS server
- Press Options > Page Down twice > Connect-Data Centre > Distributor Values > Page Down.
- Select Primary DNS server or Secondary DNS server and press Yes.
- Enter the DNS server address. To enter a decimal point (.) press the 1 key four times.
- Select Set the New Value, then press Home.
Firewall configuration
Ensure your firewall is configured to allow the franking machine to communicate with the Pitney Bowes Data Centre. See the DM Series LAN Connection Setup Guide for the required firewall settings.
DM110i / DM160i / DM220i Connection – Frequently Asked Questions
How do I reboot my comms device on the DM110i, DM160i or DM220i?
Remove the power cable, wait for the lights to go out, reinsert the cable and wait for the green light to appear before reconnecting.
What does a DE00 or DE01 error mean on the DM110i, DM160i or DM220i?
DE errors indicate a Data Centre connection failure. Try connecting at a quieter time, rebooting the machine and PC, or adjusting the PC Meter Connect transfer encoding settings.
How do I set up a wired LAN connection on the DM110i, DM160i or DM220i?
Connect the USB-to-Ethernet LAN adapter and Ethernet cable, power on the machine, then go to Options > Page Down twice > Connect Data Centre > LAN Settings > Get IP and select Automatically or Manually.
Why does my DM110i show “No Dial Tone”?
This is a generic connection error for all connection methods. Check all physical connections are secure, reboot the machine, and confirm your internet connection is working.
Still having connection problems with your DM110i, DM160i or DM220i?
Our technical team are Royal Mail Authorised Inspectors and fully qualified franking machine engineers. Call us on 01543 572 776 – Mon–Fri 9:00 to 17:00.